Giant Super Soft Spelt Buns
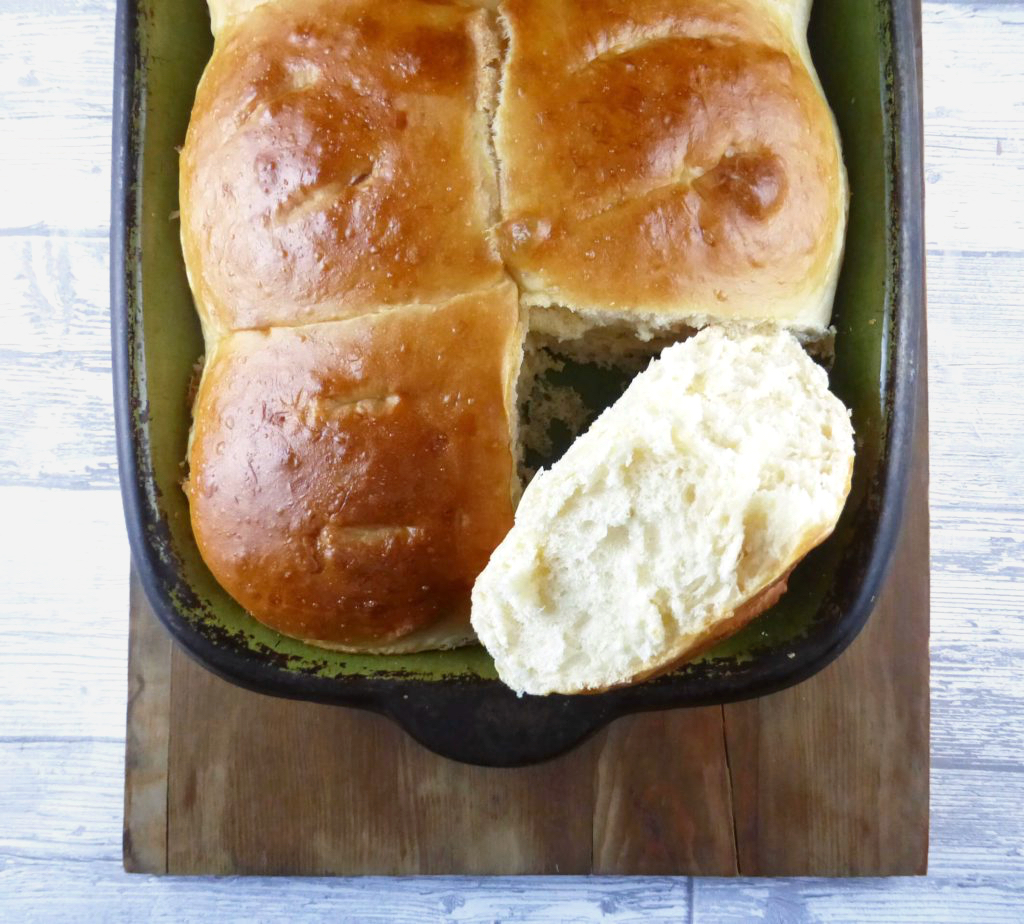
These delicious, giant soft spelt bread buns are light and fluffy. They can be filled with anything from burgers to cheese salad, and can be made in a bread maker or stand mixer. If you don’t have spelt, you can replace it with all-purpose or bread flour.
In this post I am going to give you the recipe for these amazing buns, but also some easy to follow suggestions on how you can get the best out of your spelt flour dough. Let’s get started!
While you’re here, if sliced white bread is your thing, make sure you check out my white spelt sandwich loaf (made in a bread maker).
Some of the links in this post may be affiliate links. Please read my disclosure and privacy policy for more information.
_________
Baking bread with spelt flour
I love spelt flour (obviously) but sometimes find the way it behaves in bread a little unpredictable. Blow-outs seem to occur more frequently than with regular flour, and the bread can bake a little lopsided. As always in baking, a chemical reactions is at play: although spelt flour contains gluten, it’s a sensitive gluten, one that reacts differently with water and needs special care.
I’ve tried pretty much everything to prevent bursting from happening. Long proofing periods, slashing the bread, stretching it tight. You name it. Everything you might have learnt about baking bread can be put to one side when using spelt. Although the tips coming up might help, sometimes, we just need to be okay with less than perfect bread. It still tastes good, after all.
Don’t use too much flour
Spelt flour requires more liquid than wheat flour. I always make my dough very sticky and gradually add more flour as I go. When I make my dough in a bread maker, I use much less flour than needed, and then work more in after the dough-making process has finished.
Because my recipes are adapted to use both all-purpose and regular flour, and they behave differently, I always recommend starting off with a very sticky dough. Then, slowly add flour as needed. Very sticky dough can be worrying, I get it. It’s certainly a little harder to handle. But never be afraid of sticky dough, especially when making spelt bread. Don’t think it’s all gone wrong and throw in more flour. Too much of the white stuff and your bread will be dry and dense.
Let the dough proof slowly
In an optimum environment (nice and warm), spelt dough is a very quick riser. Perhaps a little too quick. As mentioned, the gluten in spelt flour is a more delicate than regular wheat flour. I think a quick rise further weakens the gluten, causing bursts and lopsided bakes.
I’ve found that the controlled environment of a bread maker is great when making spelt dough. Also, letting your dough proof overnight in the fridge works particularly well with spelt flour. The long resting time allows the dough to proof very slowly, which seems to help strengthen the gluten.
Don’t over knead the dough
We’re told that an under-kneaded dough can be catastrophic, but less is more in the case of spelt bread. This is why I prefer using my bread machine. The controlled kneading pattern means that you can’t accidentally overwork the dough. Remember, spelt flour is more delicate than regular flour and too much kneading or stretching can weaken its structure. This could result in not only bursting, but is likely to produce crumbly bread.
Bake at a lower temperature
Spelt bread placed into a very hot oven rises like there’s no tomorrow. Always good news for any baker peering in to make sure the yeast is working its magic. However, although a good rise allows for softer bread, it can also bring with it unsightly burst seams.
Slashing the bread before baking seems to help a little, but it doesn’t alleviate the problem entirely. I found that lowering the oven’s temperature, and baking the bread in the lower part of the oven, makes the dough rise at a slower pace. Another idea is to use steam to bake your bread. All of these suggestions will help alleviate any sudden pressure on the somewhat fragile spelt gluten.
Don’t overbake your bread
This is a general rule and not something specific to spelt bread. It’s very easy to let your bread bake for too long. We’ve all done it, especially if we’ve ever taken a loaf out too soon, and sadly discovered that it hasn’t cooked all the way through. Spelt bread does have a tendency to bake up a little drier, so make sure you err on this side of caution. Absolutely, there’s a very fine line between doughy, underbaked bread and irresistibly soft bread, so and check your bread for readiness early on.
Use a deep loaf tin
Another way to stop the sides bursting is to use a very deep loaf tin. My bread machine tin has high sides, and I don’t get any bursting when making loaves like my cinnamon toast bread. The same happens when baking in the oven, so where possible, use a bread pan with high sides.
If you don’t have a deep tin, just make sure you don’t add too much dough. Although there might be the temptation to over-fill a pan to get a lovely, high loaf, this can be disastrous for spelt bread. As we’ve mentioned, spelt can rise a lot. Therefore, as a rough estimate, the dough should only fill about a third of a pan before you leave it to rest before baking. It will rise further while resting, and continue to do so during the baking process. If your dough has already risen to the top of the pan before baking, it is not going to have the sides of the pan to support it as it bakes.
Making these super soft spelt buns
One method that works really well when making bread buns is placing them close together. I do this for hot dog buns and subway buns. As they bake, they mould into each other, creating super soft interiors. Baking the bread this way also prevents some of the bursting.
I did the same for these buns. The first time it happened was by pure accident, but I loved the result so much that I now bake all of my buns this way. I used this method for my overnight coffee cinnamon buns and they were humungous, but so utterly fluffy in the middle.
You can use these buns for pretty much anything. They are great with a burger with all the trimmings slapped inside. Tuna and red onion and egg mayonnaise are two of my favourite fillings, but you could use anything. The buns are also fabulous dunked into a thick, warming dish, like my roasted tomato soup.
I’ve had tremendous success with my base dough recipe. I’ve made it by hand (my least favourite way), and in more recent years, with a bread machine and stand mixer. It can also be adapted in so many ways. It’s a winner!
Super Soft Spelt Flour Bread Buns
Ingredients
Dough (see note 1)
- 250ml (1 cup) milk
- 50g (3½ tbs) butter
- 1 egg (medium)
- 400-450g (3⅓ - 3¾ cups) spelt flour (see note 2)
- 7g (2¼ tsp) dried yeast (see note 3)
- 1 tsp sea salt
- 1 tbs sugar
Instructions
Bread Machine:
- Add the milk, butter, and egg to your bread machine pan.
- Then, add 400g (3⅓ cups) of flour, and the remaining ingredients. Set your machine to make dough.
- On a very well-floured surface (the dough will be very sticky) work in just as much flour as you need to make a soft, pliable, but still a little tacky, dough. Read here for more info.
Stand Mixer:
- Add the milk, butter, and egg to your stand mixer bowl. If the butter is straight out of the fridge, it won't combine with the other wet ingredients too much, but that's okay.
- Then add 450g (3¾ cups) of flour, and the remaining ingredients. The dough should be sticky, but if you need more flour, just add a little at a time. Be careful: too much flour will result in dry bread. Read here for more info.
- Switch to a dough hook (if you have one) and allow the mixer to knead the dough for around 5 minutes, just until soft. The dough will still feel a little tacky to the touch, but will be able to slowly drop off the hook.
- Cover the dough and leave to proof (until it has doubled in size - usually about an hour).
- When the dough is ready, knock it back, and on a floured surface, form into a rough ball.
Both Methods:
- Grease a baking dish or line an oven tray with baking paper.
- Divide the dough into six fairly equal parts, and roll into balls.
- Place the balls in the dish or on the tray with just a little space between them (you want them to join together when baking, as this is what makes them so soft)
- Cover with a tea towel and leave to rest for around 30 minutes.
- Pre-heat the oven to 200°C (400°F).
- Bake the buns in the lower part of the oven for around 20 minutes, until nice and golden on top (they are ready when they sound hollow when tapped on the bottom) - see the main post for more info.
- Either allow to cool a little and then serve warm with dinner or eat them cold with your favourite filling. Enjoy!
Notes
- I have made the dough using both a stand mixer and bread machine with identical results. I have not made the dough by hand, but I see no reason why you couldn't do so!
- You can use spelt or regular flour for this recipe (just use the same amount). You may need a little more flour if using all-purpose (plain) flour.
- In Sweden we have something called dried yeast. It is used both in warm liquid to proof and also added directly to flour. I am aware that the US has two options for dried yeast, and I believe instant yeast is the most similar to our dried yeast.
5 thoughts on “Giant Super Soft Spelt Buns”
Leave a Reply


This is such an easy no hassle recipe, I’m so glad I found you!! Made it tonight and it is, absolutely pillowy soft and delicious, this will be my regular go to recipe
Ah, thank you so much for letting me know, Ally! Yep, it is one of my favourites, too! So glad you liked it 🙂
Tried today and so pleased with the result, perfect soft rolls. So easy to make, made in my mixer. This will be my go to spelt roll recipe, thankyou!
So awesome to hear. I happen to agree that they are a winner! Thank you for sharing your feedback, Sarah!